Outdoor
Skills
<> Using a Compass
<> Building a Fire
<> Marking a Trail
<> Using a Knife Safely
<> Tying Knots
<> Making Emergency Shelter
<> Estimating time and distances
<> Building and Cooking with a Box Oven
<> Where to learn more about First Aid
Lashing (<- click there) is covered on its own separate Lashing Skills page, where you will find information, instructions, and illustrations for the construction of useful campsite items using sticks and twine.
These skills, along with cooking and first aid, will come in handy during camping events, and at many other times throughout your life.
Many of the illustrations on these tabs were taken from the 1984 edition of the book "Outdoor Education in Girl Scouting", published by the Girl Scouts of the U.S.A. Although that edition seems to be out of print and unavailable, a more recent edition is available from the Girl Scouts of the USA Online Shopping Mall, and used copies are available inexpensively from Amazon.com. This excellent book covers these topics with greater depth and detail, including hints and exercises.
One of the easiest compasses with which to learn basic orienteering skills is the Silva compass. Important parts to learn about this compass are:
- the orienting arrow,
- the compass needle (often red and black, but sometimes red and white),
- the rotating compass housing,
- and the direction of travel arrow.
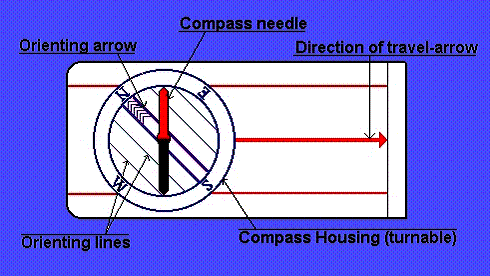
The red portion of the compass needle always points to the earth’s magnetic north. A compass measures a 360° radius, with north (N) being 0°, east (E) being 90°, south (S) at 180°, and west (W) at 270°.
Following directions using a Silva compass
 OK, so lets say you want to
travel NE for 100 yards. Here is what you
would do.
OK, so lets say you want to
travel NE for 100 yards. Here is what you
would do.
- Turn the housing until 45°is lined up with the direction of travel.
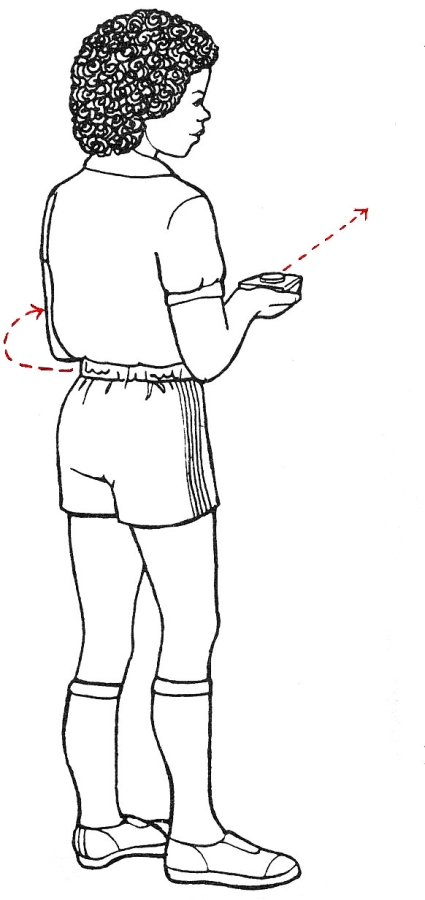
- With the compass flat and pointing straight out from your body (using your navel is a good practice), turn your body until the red compass needle is directly over the orienting arrow. You can now walk 100 yards (knowing the length of your pace would be very useful here!).
- Be sure the red compass needle is pointing north and is aligned with the orienting arrow. Beginners often make the mistake of lining up the red arrow with the south direction.
Identifying the direction of an object using a Silva compass
OK, say you are creating an orienteering map, or need to know what direction something is.
- Face the object you want to know the direction of.
- Point the direction of travel arrow to the object.
- Turn the housing around until the red portion of the needle and orienting arrow are aligned.
- Read the number lined up with the direction of travel arrow – this is the direction of the object.
Some helpful hints
- Any metal object on your clothing can alter the reading of your compass (belt buckles, metal buttons, etc…).
- When sighting with your compass, look for an object in the distance on the line of sight and walk toward it, occasionally checking your compass direction. Don’t walk looking at your compass – you will not walk in a straight line.
- If there is an object in your way, take several steps to the side, continue forward pacing until you are beyond the object, and then take the same number of side steps back to your original position, rechecking your direction. Now continue counting your paces forward.
- Practice by placing tent stakes randomly in a large area. Create cards that have three-degree listings – each 120° apart (60°, 180°, 300°). Beginning at a stake, walk 20 feet between each listing, reorienting after each one. You should return to the stake you started from. Don’t cheat! – This practice hones your compass skills.
- Learn the length of your pace. A 2-foot step is ideal, but be natural and be able to adjust. [A "pace" is two steps, and the length of your pace is the distance covered in two steps. See "Pace" on the Estimating tab.]
- There is a special type of pacing called Scout’s Pace: this is where you walk a certain number of paces (say 20), and then jog the same number. It is a very useful way to cover long distances without getting overly tired.
Basic Elements
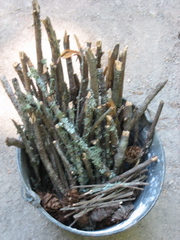
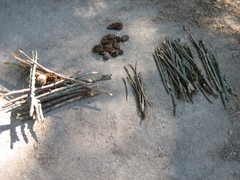
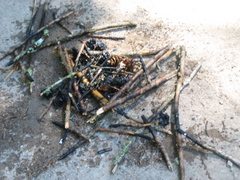
The three basic elements for a fire are fuel, flame (or intense heat), and air (oxygen). To build a wood fire, different sizes of wood -- tinder, kindling, and fuel -- should be assembled to allow for air circulation.
 Tinder:
any small
piece of material that burns as soon as it is touched with flame; wood
shavings are a good example.
Tinder:
any small
piece of material that burns as soon as it is touched with flame; wood
shavings are a good example.- Kindling: larger in diameter than tinder; must be thin enough to catch fire quickly before tinder burns out, but large enough to ignite the larger fuel.
- Fuel: the larger wood that keeps fire going.
- Fire starters are highly
flammable materials that ignite at the touch of a match:
- egg carton -- waxed sawdust, lint, or wood shavings;
- trench candles -- rolled newspaper, tie with string, dip in wax
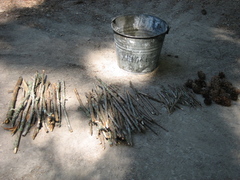
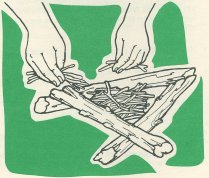
Building the Fire
- Choose a spot with no overhanging tree limbs, rotting stumps, logs, grass, or leaves; clear the ground to bare earth or rock in a 3 foot circle.
- Always have a large bucket of water with a stick sitting in it near the fire.
- Tie back long hair, tuck in hood strings, roll up loose sleeves, check for tied and tucked in shoelaces, do not wear clothing with dangling ends while building or tending a fire.
- Plan a fire just big enough to do the job so fuel will not be wasted.
Fire structure:
- Make a small triangle, with three pieces of
kindling;
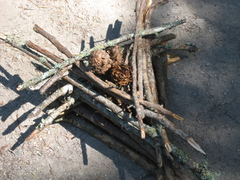
or a 4-sided log cabin continuing to build up in layers;
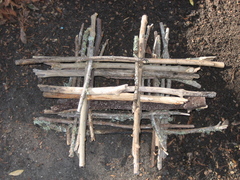
or make a free-standing teepee.
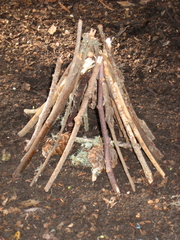
- Leave a space between the 2nd and 3rd layers of
the triangle or log cabin; or leave one wide space between 2 upright
pieces of the teepee. This space is where to light
the fire with your match.
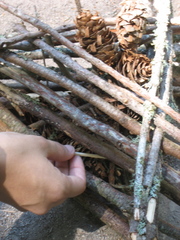
- Place a handful of tinder in the center of your
structure.
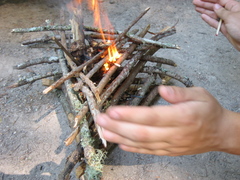
- Strike the match close to the wood and
close to the space left in the structure. Insert the lighted
match into the space provided and light the tinder.
Shield the tinder so it gets just the right amount of breeze to
ignite the structure and burn upwards.
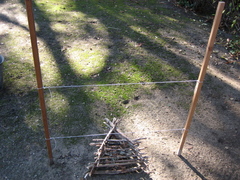
For the camping fire-building event, build the structure below a string 8" above the ground. Flames must burn through a string 20" above the ground.
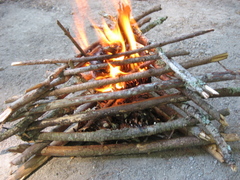
Putting Out a Fire
Let a roaring fire die down then stir the remaining structure and ashes apart with the stick that has been sitting in the water bucket and hand sprinkle with water---do not pour the bucket of water on the fire. Repeat until when a hand is passed over the fire circle several inches above no warmth from wood pieces or ash is felt anywhere in the fire circle.
Trail Signs
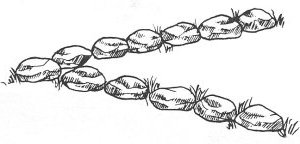
Trail signs or trail markers are used to mark the direction of a path others are to follow. To be effective, they must be immediately recognizable and easy to see. These signs and blazes can be made from sticks and/or twigs, stones, grass stalks, cloth strips, or painted blazes of a single color.
Go to the Left.
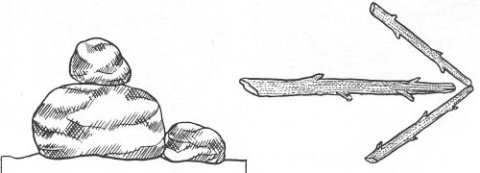
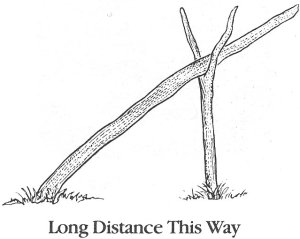
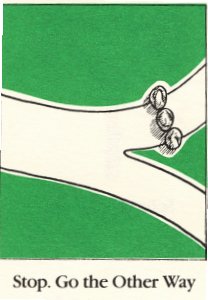
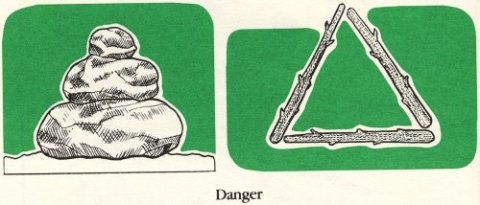
Meanings of Trail Blazes:
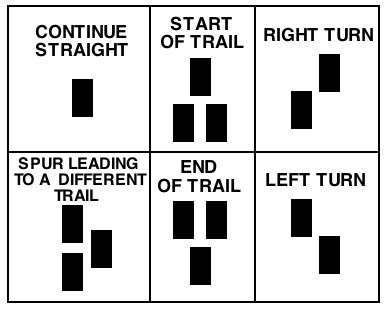
The most common symbols used in trail blazing.
Rectangles are generally 2 x 6 inches.
Jackknife Use & Safety
Along with the privilege of having a knife comes the responsibility of using it properly to ensure the safety of users, other campers, and the environment.
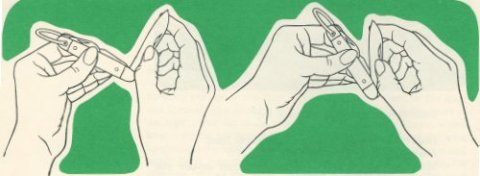
Knife Safety Circle
- A knife is a tool, not a toy.
- Always establish a safety circle when using a knife.
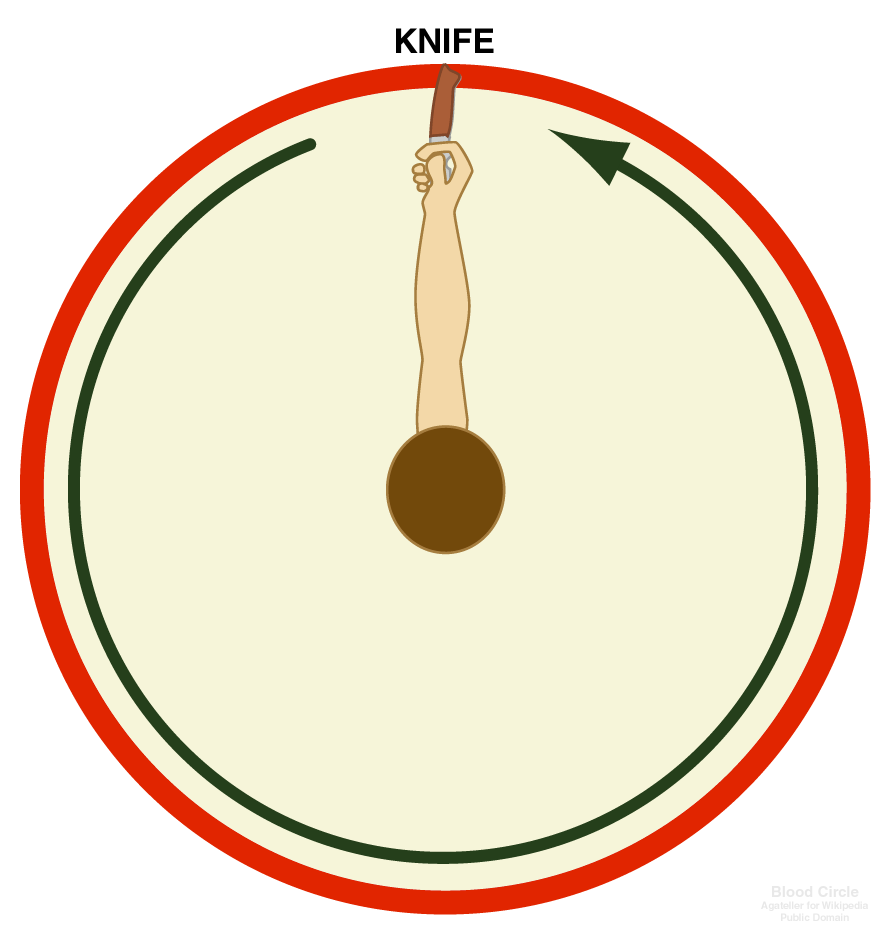 |
Place the closed knife in your hand and then extend your arm. Move your arm around you. If another person is within reach, move to a new location and try again to establish a safety circle. |
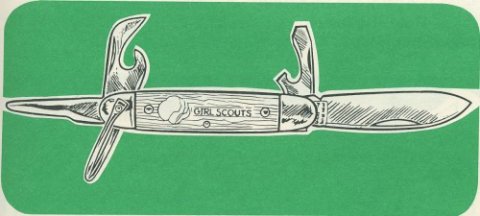
A jackknife is a knife with a folding blade that will be used often for a wide variety of tasks: cutting a rope, scraping a carrot, trimming a branch, or whittling wood to make tinder. Jackknives sometimes have more than one blade or tool. For safety, only one tool or blade should be opened at a time.
Some tips for using the jackknife are:
- Hold the handle securely with the whole hand
- Always cut away from the body
- Move at least an arm’s length away from anyone else before using a knife---ring of safety
- Keep the knife closed when not in use
- Do not walk around with an open knife
- Keep the knife away from extreme cold or heat
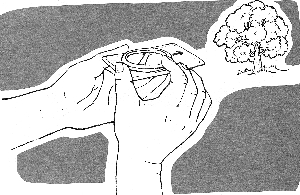
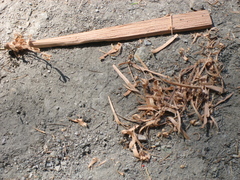
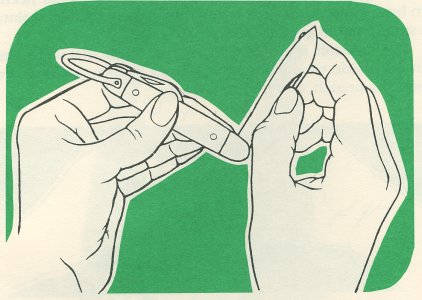
Opening the Jackknife
Hold the jackknife firmly with the fingers of one hand. Hold the top edge (slot) of the blade with your thumb and forefinger. Keep your fingers away from the sharp cutting edge of the blade. Pull the blade all the way out until it clicks into its open position.
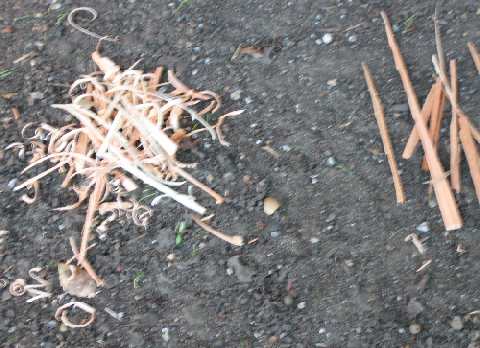
Whittling Wood Tinder
- Hold the handle of the jackknife firmly. Do not put your thumb on the blade.
- Cut away from the body
- Cut slowly so the knife won’t slip
- Cut the stick at an angle shaving off little pieces of wood
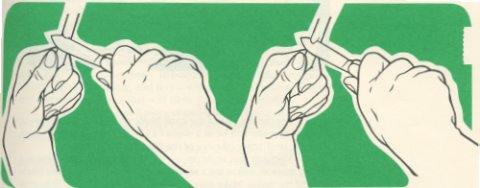
Closing the Jackknife
Hold the handle of the jackknife in one hand with the sharp cutting side of the blade upward. Hold the dull non-cutting side of the blade in the other hand. Push the blade up and around toward the slot in the handle.
A basic knowledge of how to tie a few knots is an essential outdoor skill. All knots have a free or working end and a standing or stationary end. To practice knot tying, you will need a 3 foot length of rope. Cotton clothes-line rope works very well. You should secure the ends by binding it with string or tape.
Square knot – One of the easiest of basic knots, the square knot is useful in joining two ropes of the same thickness together, may help in tying a bandage or sling, is handy in tying items to your belt or backpack, and can be used to tie a bandana around your neck.
- Start by tying an overhand knot (like you would begin tying your shoes).
- The rope that is on top stays on top and makes the second part of the knot by tying another overhand knot.
- Pull the ends tightly to finish and secure the knot.
Click on control to play demonstration.
Clove Hitch – This knot is used to secure a rope to a post or tree. It is very handy in creating a dunk line or clothes line between two trees; and when secured at each end, it will not slip.
- Begin by passing the short end of your rope behind a tree or post.
- Bring the short end around to the front of the tree and form an “X”, with the short end being on top and becoming the ‘working’ end. Hold this ‘X’ with your thumb and fingers.
- Pass the short end around the tree again, wrapping it below the first pass. Your fingers will show you where the rope will go next.
- Push the working rope end under the ‘X’ and pull the ends tight. Your knot should look like an X.
- You may now fasten the long (or standing) end to an opposite tree or post for a strong dunk or clothes line.
- To remove this knot, pull on the X.
Click on control to play demonstration.
Bowline – This knot makes a loop that will not alter in size. It can be used as a safety line for lifesaving or may be useful for hanging items in your campsite. Note: the standing end of the rope is usually attached to something before this knot is made. Often called the land of sixes or the rabbit in the hole.
- Begin by forming a 6 with the working end of the rope (the bowl of the 6 becomes your small loop). Remember, when you write a six on paper, the pencil mark goes over the down stroke. The same happens here – pass the working end over the standing end creating a small loop.
- The working end then passes from the bottom of this loop up toward the standing end. This larger loop size is based on how you will use your bowline.
- Pass the working end behind and around the standing end, re-entering the small loop from the top.
- Pinch the two pieces of rope that have passed into the loop with one hand while holding the standing end with the other hand. Pull apart with both hands to tighten the knot.
Click on control to play demonstration.
Taut-Line Hitch Reversed (3 wraps) – This knot is used to create a loop that adjusts, or ‘slips’. It is useful for shelter or tent pitching.
- Create a loop with the working end of your rope, crossing over the standing end.
- Wrap the working end completely around the standing end for total of two passes. You will end up with your working rope emerging from the loop.
- Pass the working end over the bottom part of its original loop.
- Pass the working end under the standing end and tuck it back into itself, forming a third wrap in the opposite direction outside the original loop.
- You will end up with a total of three wraps with both ends on the same side of the original loop. The knot will slip back and forth.
- To release this knot, just pull the slipping part out.
Click on control to play demonstration.
Emergency Shelters
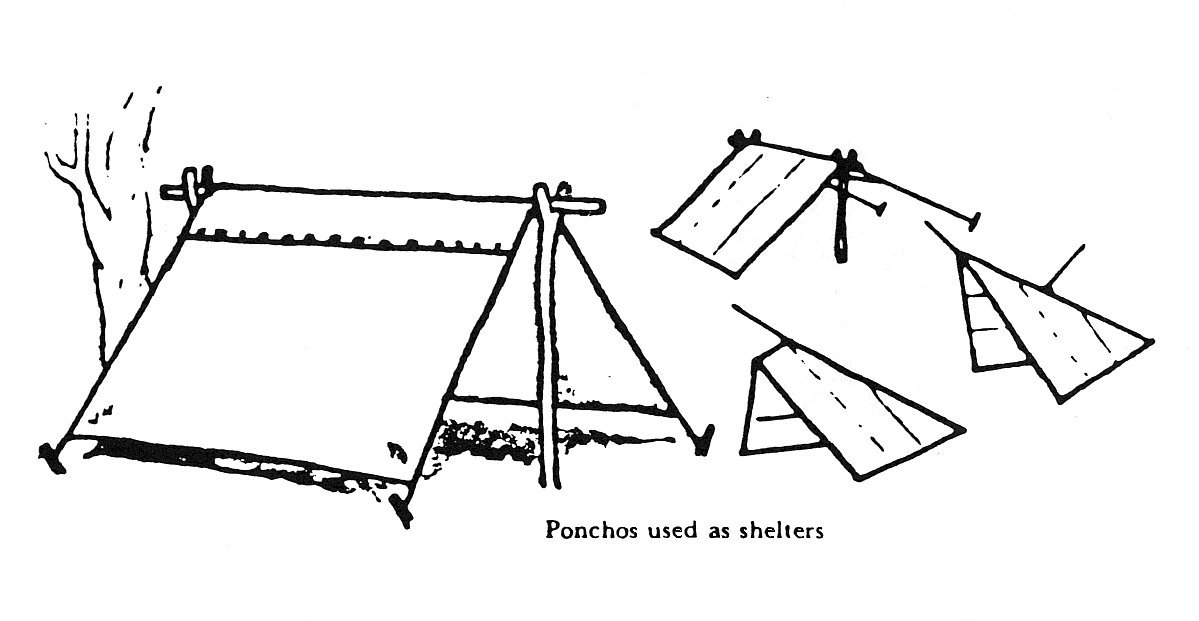
Your day of hiking may begin with clear skies and an excellent weather forecast, but hiking in the woods can often bring the unexpected. Even with the best planning, there may come a time you will need to create your own emergency shelter. In the mountains, you may need to shelter from wind, rain or snow. In the desert, you may need to shelter from sun and/or wind. With this in mind, you should always have a poncho or small ground sheet and some rope or twine in your backpack. Having these items readily available may help you create an appropriate shelter. If you use a walking stick, this can be an added bonus in an emergency.
Determining what shelter works best in each situation requires some thought and skill.
Rain Shelter
The easiest and fastest shelter would be to find a fallen tree or overhanging rock that can be used as a natural barrier to rain and wind. By wrapping yourself in your poncho or tarp you could stay reasonably dry through a short downpour.
But what if there was no natural barrier or the
rain and
wind required
more protection? You can make a temporary shelter
fairly quickly using your poncho or tarp, your walking stick or tree
branches, and rocks that would shelter several people.
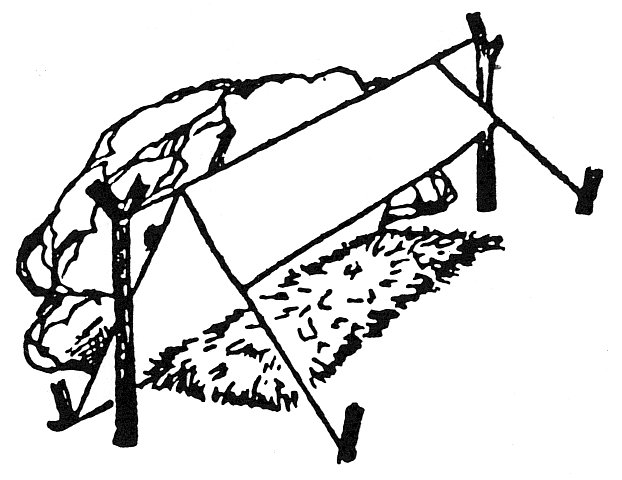 |
Always remember to check for wind direction, sloping in case of water runoff, |
| and when possible, use bracken or grass for a dry floor. | 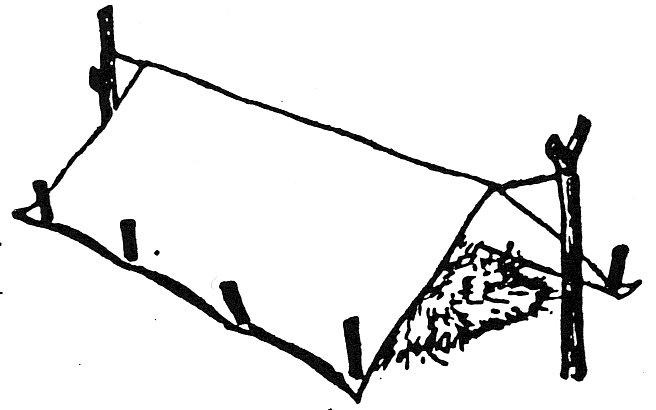 |
| If your ground sheet is large enough, you can wrap it to cover the floor. | 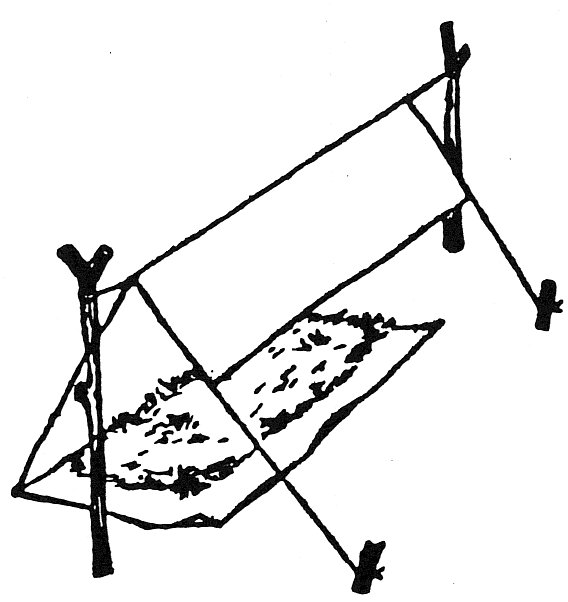 |
 |
An open-ended shelter gives little protection when it is windy. A shelter staked to the ground with one opening (away from the wind and rain direction) will keep you dry and warm. |
| Ground duff (leaves and de-composting material)
piled on top of your
staked tarp edge works well to keep moisture from seeping under your
shelter. |
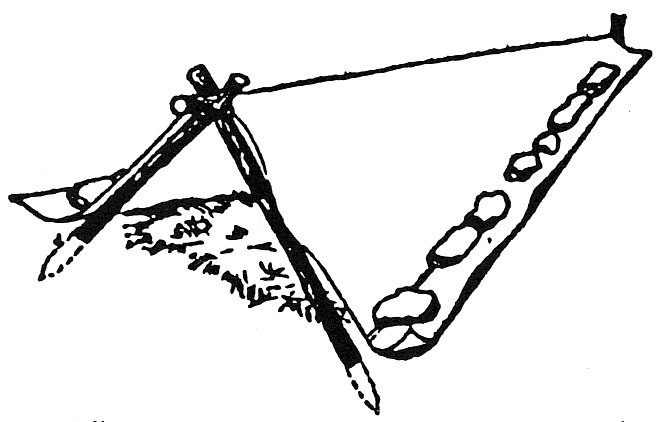
Sun Shelter
A shelter from the sun can be more open sided
than one
protecting you
from wind and rain.  The
object with this shelter is to
get out of the sun to protect you from dehydration and
sunstroke.
The
object with this shelter is to
get out of the sun to protect you from dehydration and
sunstroke.
If there were little or no wind, you would want
large opening to help air circulation. If it is also windy,
you may have to adjust your shelter to accommodate for this factor.
Regardless of which type of shelter the weather requires, because you are prepared you can create a structure to protect you from the elements until you can continue on your hike. In either case, always consider the following:
- Pick a safe place for your shelter, away from obstacles, potential for falling rocks or tree limbs, and animal dens/nests.
- Do not place your shelter in a dry watercourse. The potential for flooding in a rain storm is always high.
- While sunlight will supply warmth (not wanted in a desert situation!), open areas are more vulnerable to wind.
- Open-ended and large shelters do not retain heat. Determining how your shelter is to be used is very important. Smaller, closed shelters are better in rain and wind, while an open sided structure would be better in heat.
Your body can be used for measurement in the woods if you know key facts. Knowing your own, or a fellow scout’s, height can help you determine the height of an
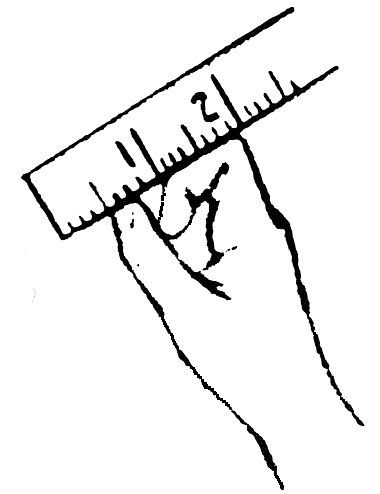 object. Knowing your pace
can help you determine how
long it will take you to cover a known distance or would be
useful on an orienteering course. Knowing which of
your
finger joints is 1 inch can help you locate a stick that
thickness. And, the width of your hand span or arm reach can
help in determining an object’s length or
circumference. Knowing how to count elapsed seconds is
helpful in guessing how much time
has gone by. Think how useful this would be if you needed to
cook an egg and didn’t have a watch!
object. Knowing your pace
can help you determine how
long it will take you to cover a known distance or would be
useful on an orienteering course. Knowing which of
your
finger joints is 1 inch can help you locate a stick that
thickness. And, the width of your hand span or arm reach can
help in determining an object’s length or
circumference. Knowing how to count elapsed seconds is
helpful in guessing how much time
has gone by. Think how useful this would be if you needed to
cook an egg and didn’t have a watch! | Personal Measurements | Person #1 | Person #2 | Person #3 | Person #4 |
|---|---|---|---|---|
| Height | ||||
| Arm span: fingertip to fingertip | ||||
| Length of right foot | ||||
| Hand spread: with hand spread out, thumb tip to last finger tip | ||||
| Find a 1 inch finger joint | ||||
| Pace: (measure # of steps in 50 ft.) |
To figure out body measurements, you will need a measuring tape and a ruler.
Pace: This is the distance you cover in 2 steps.
- Mark off a pace line by placing a stake into the ground at each end of a measured distance (example: 50 feet); or by drawing chalk marks at 2 foot intervals for the length of a measured distance (example: make a mark every 2 feet for 50 feet).
- Walk from one end of the pace line to the other in your normal stride. You should be walking naturally, not elongating your steps or shortening them. Count the number of paces taken. (Pick either your right or left foot and count each time you put down that same foot.)
- Repeat 2 more times. Add together the number of paces taken each time and divide by 3 to get the average number of paces taken in the measured distance.
- Now you know your pace
Length: What is the length of your foot? Which joint in a finger measures 1 inch?
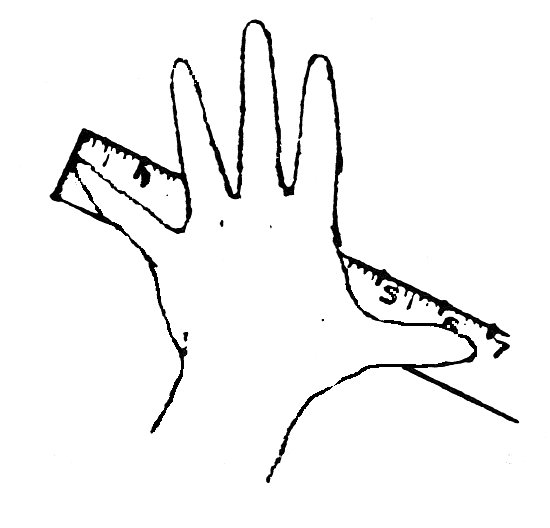 What is your arm
span from fingertip to
fingertip? What is your hand span from thumb to little finger
with the fingers spread out?
What is your arm
span from fingertip to
fingertip? What is your hand span from thumb to little finger
with the fingers spread out?Time: Do you have a practiced method for determining when a certain amount of time has gone by? Is it tapping your foot, swaying side-to-side, counting 1,000 - 1; 1,000 - 2? Knowing what works for you ahead of time comes in handy in many situations.
Height: If you know your own height or the height of a fellow camper, you can easily determine the height of another object (say a tree). Have a person whose height is known stand against that object, and then holding a pencil with your arm outstretched, close one eye and look at your friend. Using your thumb, mark where your friend reaches on the pencil. Now see how many times you need to stack that height to reach the top of the tree. You then multiply their height times how many times you stacked your thumb. This will be the approximate height of the object.
Weight: By practicing ahead of time, you can become fairly proficient at determining something’s weight. Start by lifting something whose weight is known – say a 1-pound bag of rice. Repeat this with both hands until you feel comfortable holding something that weighs 1 pound. Now pick up something else whose weight you don’t know (have someone put an item in a bag so you can’t see the weight). Is it heavier or lighter? Keep testing yourself with known and unknown weights until you feel comfortable you can tell the difference between the weights of different objects.
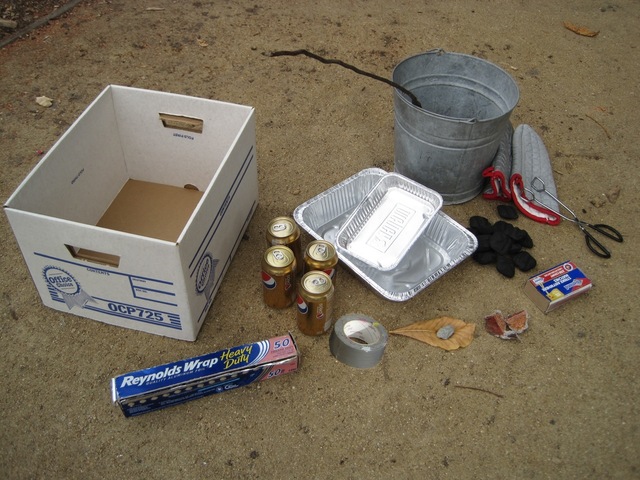
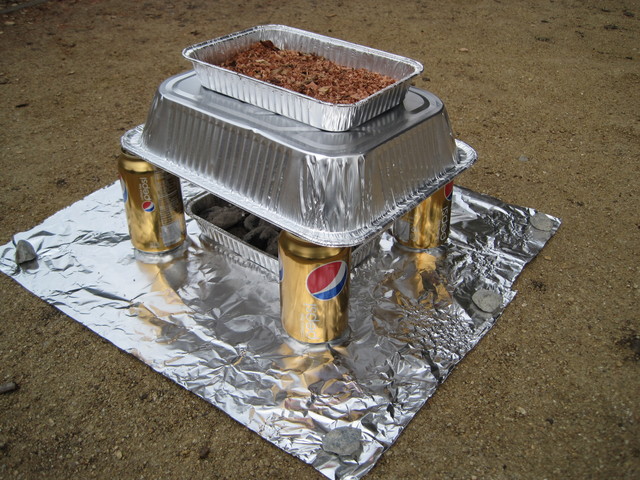
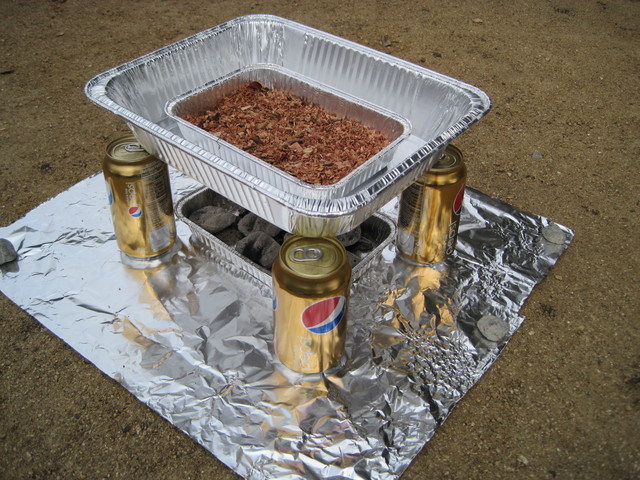
A box oven can be used to cook anything you might cook in your oven at home. It‘s a great way to expand your cooking options when camping using simple materials and cooking techniques.
Simple Box Oven Construction
Materials:
- A cardboard box (cardboard files box is a good size – approximately 16 in. x 12 in. x 10 in. ht.)
- Large roll of heavy duty aluminum foil
- Four small empty cans (soda or soup can size work well)
- Two aluminum pans: one slightly larger than the other; the larger must be smaller than the box in length and width by at least 1 inch in all directions
- Charcoal briquettes (amount depends on what you are cooking – see below)
- Fire starter material
- Small stone (no larger than 1 inch diameter)
- Duct tape
- Pot holders
- Tongs
- Matches
- Water bucket
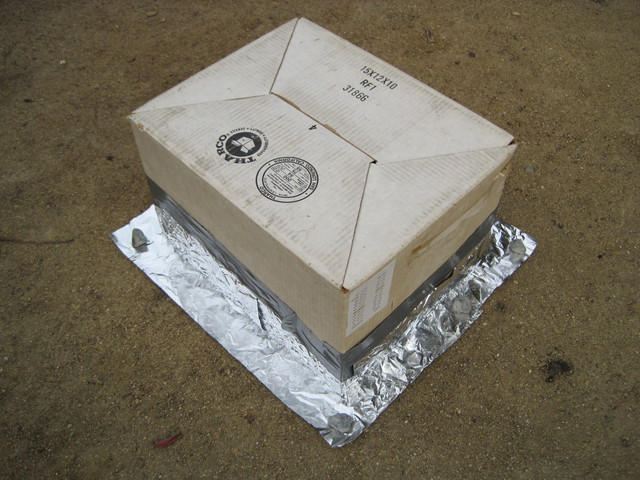
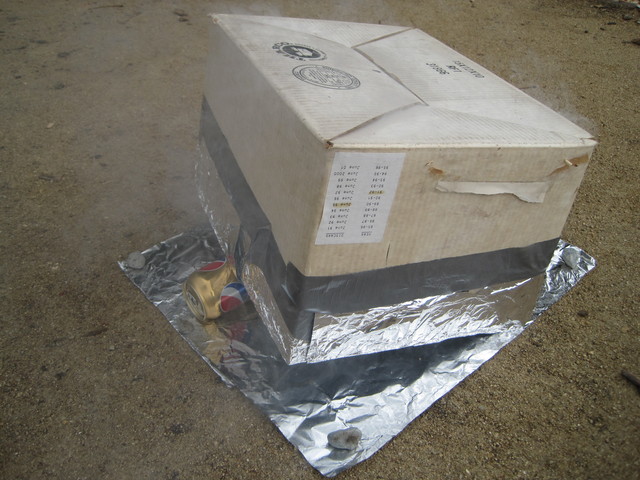
Place a sheet of foil (shiny side up) that is slightly larger than the box opening on the ground where you will be cooking. Anchor the corners with small stones.

|
|
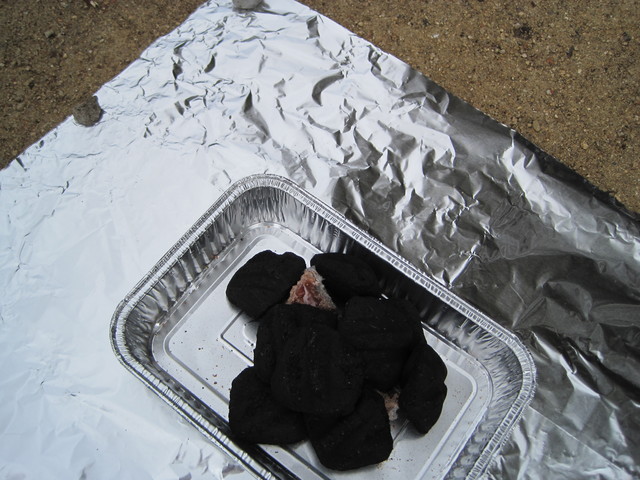
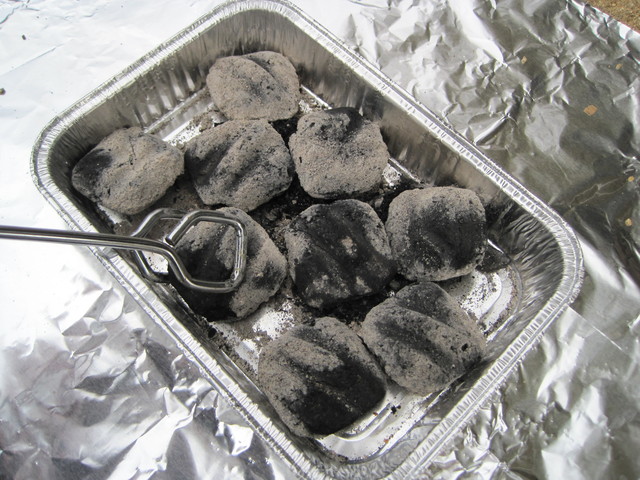
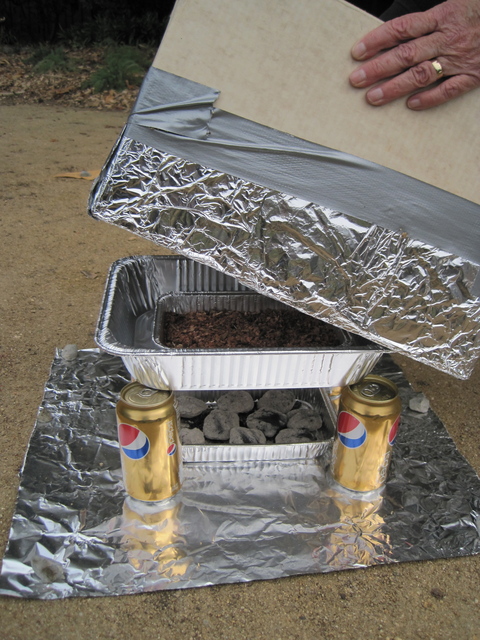
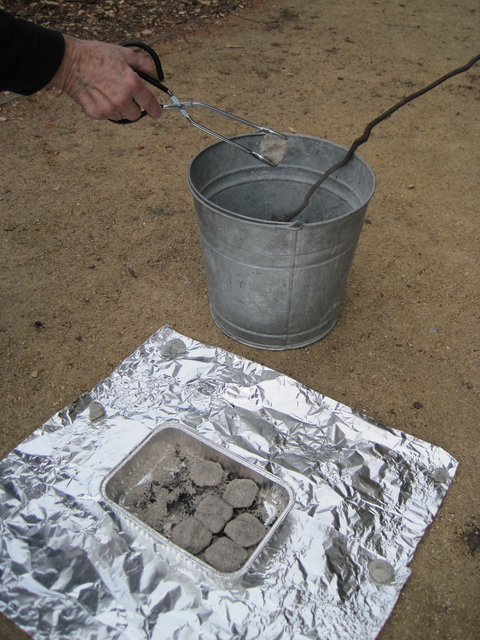
Light the charcoal:
While the charcoal is being lit and turning to ash,
Place the fire starter material into the center of the smaller aluminum pan. Pile charcoal (see *note below) on top of the fire starter material leaving an opening to the starter material for a match.
| 
|
| Light the fire starter material and that will in turn light the charcoal. Let the charcoal burn until covered with ash (this should take approximately 20 minutes). |

|
| Hint: once the box oven is constructed, it can be placed over the charcoal with one edge of the box propped open on one or two of the cans to speed up the coals. |
|
| Then spread out the charcoal to the edges of the pan creating a single
layer and you are ready to cook. |
|
*note: each charcoal briquette will be approximately 40 degrees; 9 briquettes will create a 350 degrees oven temperature. Varying the number of briquettes is how you can vary the oven temperature to fit your recipe.
Construct the box oven:
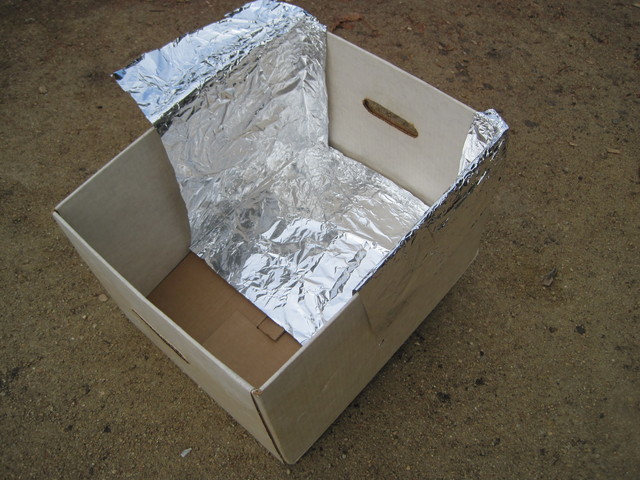
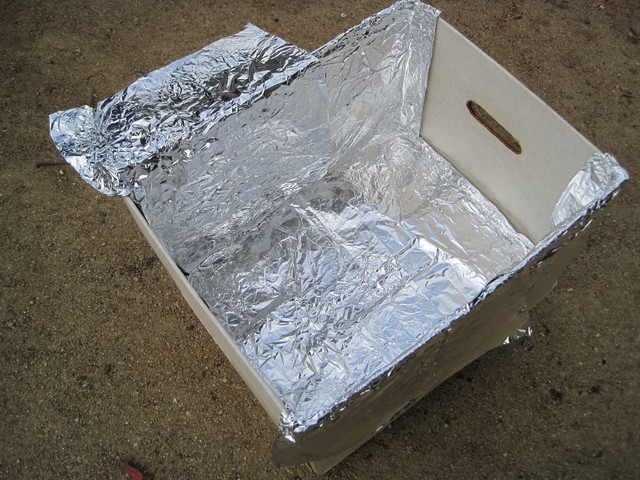
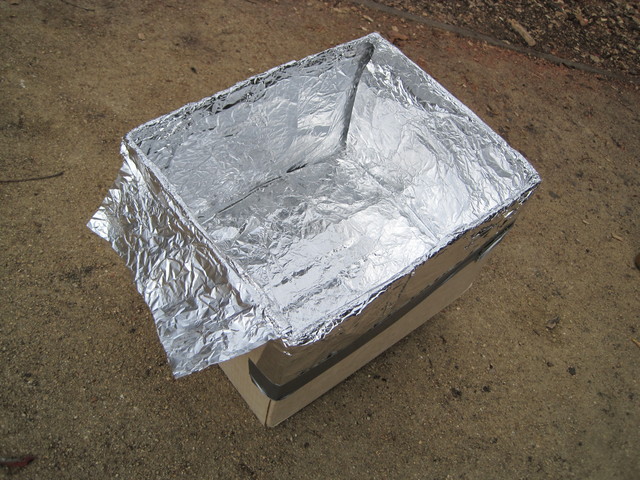
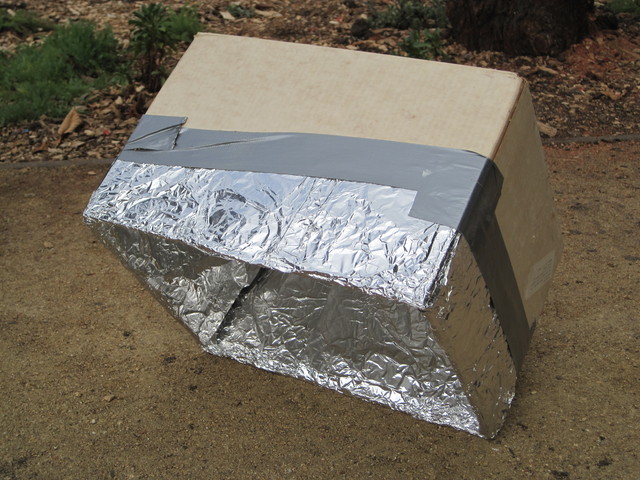
Prepare your cardboard box by completely covering the inside of the box with foil and extending foil up the outside of the box 4 inches. Secure the foil to the outside of the box with the duct tape, making sure no tape is on the inside of the box (it will burn) and that the inside is completely covered with foil.
| 1 | 2 |
|
|
| 3 | 4 |
|
 |
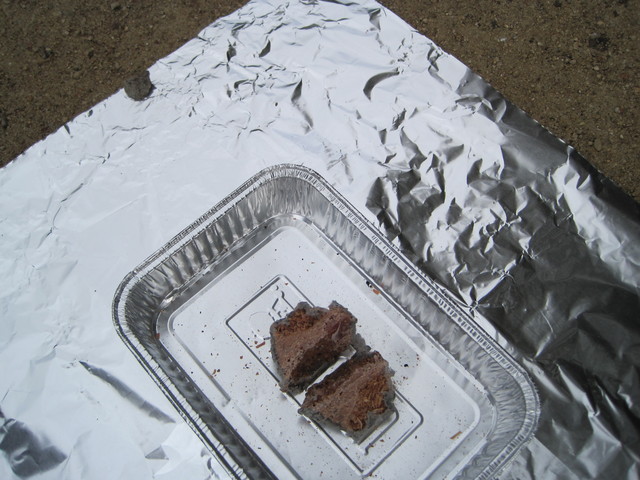
Food preparation:
While your charcoal is lighting, prepare whatever you have chosen to cook
in your box oven. This may be a prepared package of cake mix,
brownies, muffins, corn bread, etc., or your own culinary delight:
fruit cobbler, mini pizza, etc., but it should require cooking at the
temperature your briquettes will achieve. Put it into an appropriate
baking pan to be ready to place into oven.
Oven Assembly:
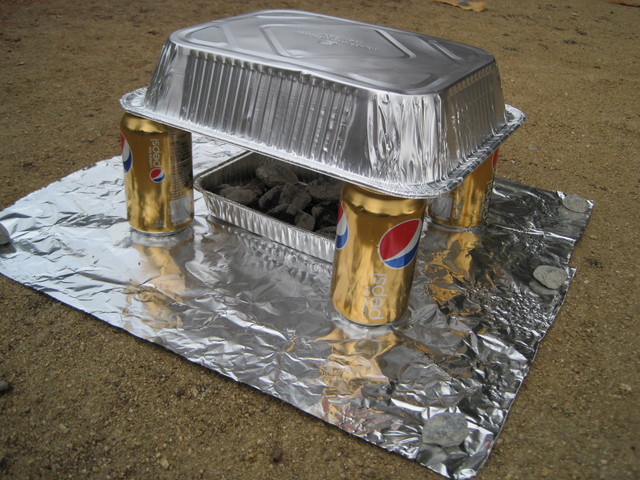
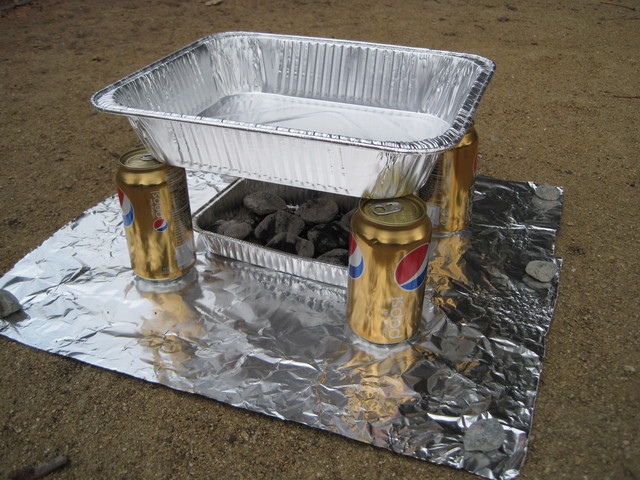
Put the coals pan in the center of the aluminum foil spread out on the
ground---be sure the pile of coals have been spread to edges of coals
pan to create one layer. Place the 4 empty cans around the edges of
your coals pan. Then put the larger aluminum pan on top of the cans
to act as a shelf on which to place your baking pan.
| OR |
 |
| OR |
 |
|
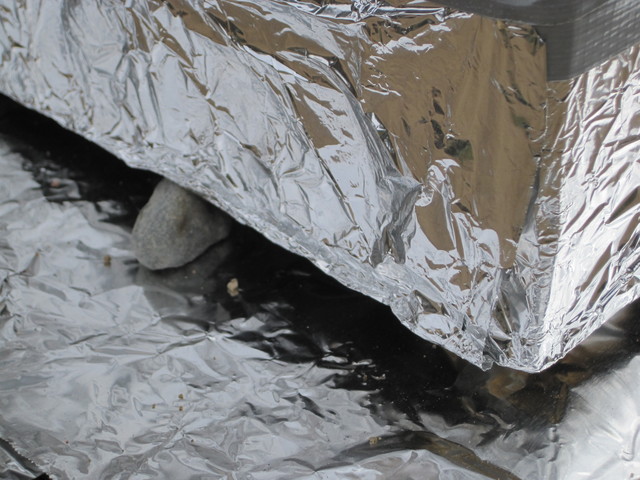
Place the box oven over the coals and item to be cooked.
Then prop one edge open using the small rock -- no higher than 1 inch. This allows air to circulate keeping your charcoal burning because fire requires oxygen to burn!. Time your baking based on your recipe directions. |
|
Try not to peek! But if you must add charcoal or check your cooking process, have everything ready to do it quickly. Having your oven open causes a fast loss of critical heat for the cooking process. |
|
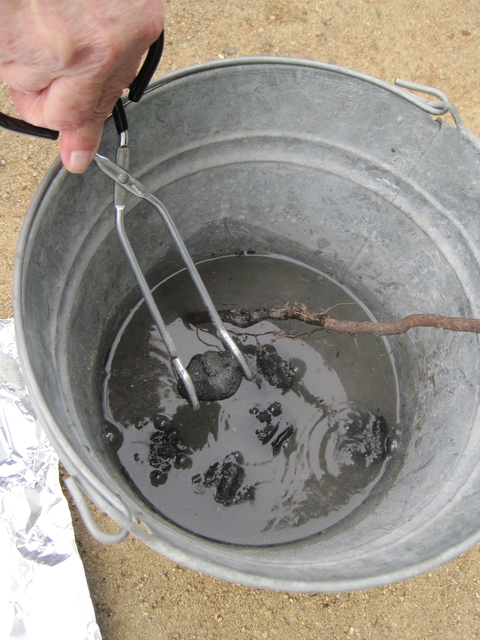
Extinguish the coals:
 |
Use the tongs to place coals into the water in the water bucket. Dispose of wet ashes in an appropriate manner. |
|
When a person is injured or experiences a sudden illness someone should help. Everyone should know what to do in an emergency -- whom to call and how to give first aid until emergency medical help arrives.
Knowing what to do for wounds, bleeding, burns, shock, choking, broken bones, sprains, fainting, poisons, extreme heat, and severe cold can save someone’s life.
For basic first aid skills, the American Red Cross conducts classes. Below you will find links to other resources.
https://www.health.harvard.edu/pain/emergencies-and-first-aid-how-to-make-a-sling
https://www.verywellhealth.com/first-aid-emergency-preparedness-4013484
https://www.mayoclinic.com/first-aid index